Updated July 27, 2026

3D Roofs Editorial Team
Editorial Standards
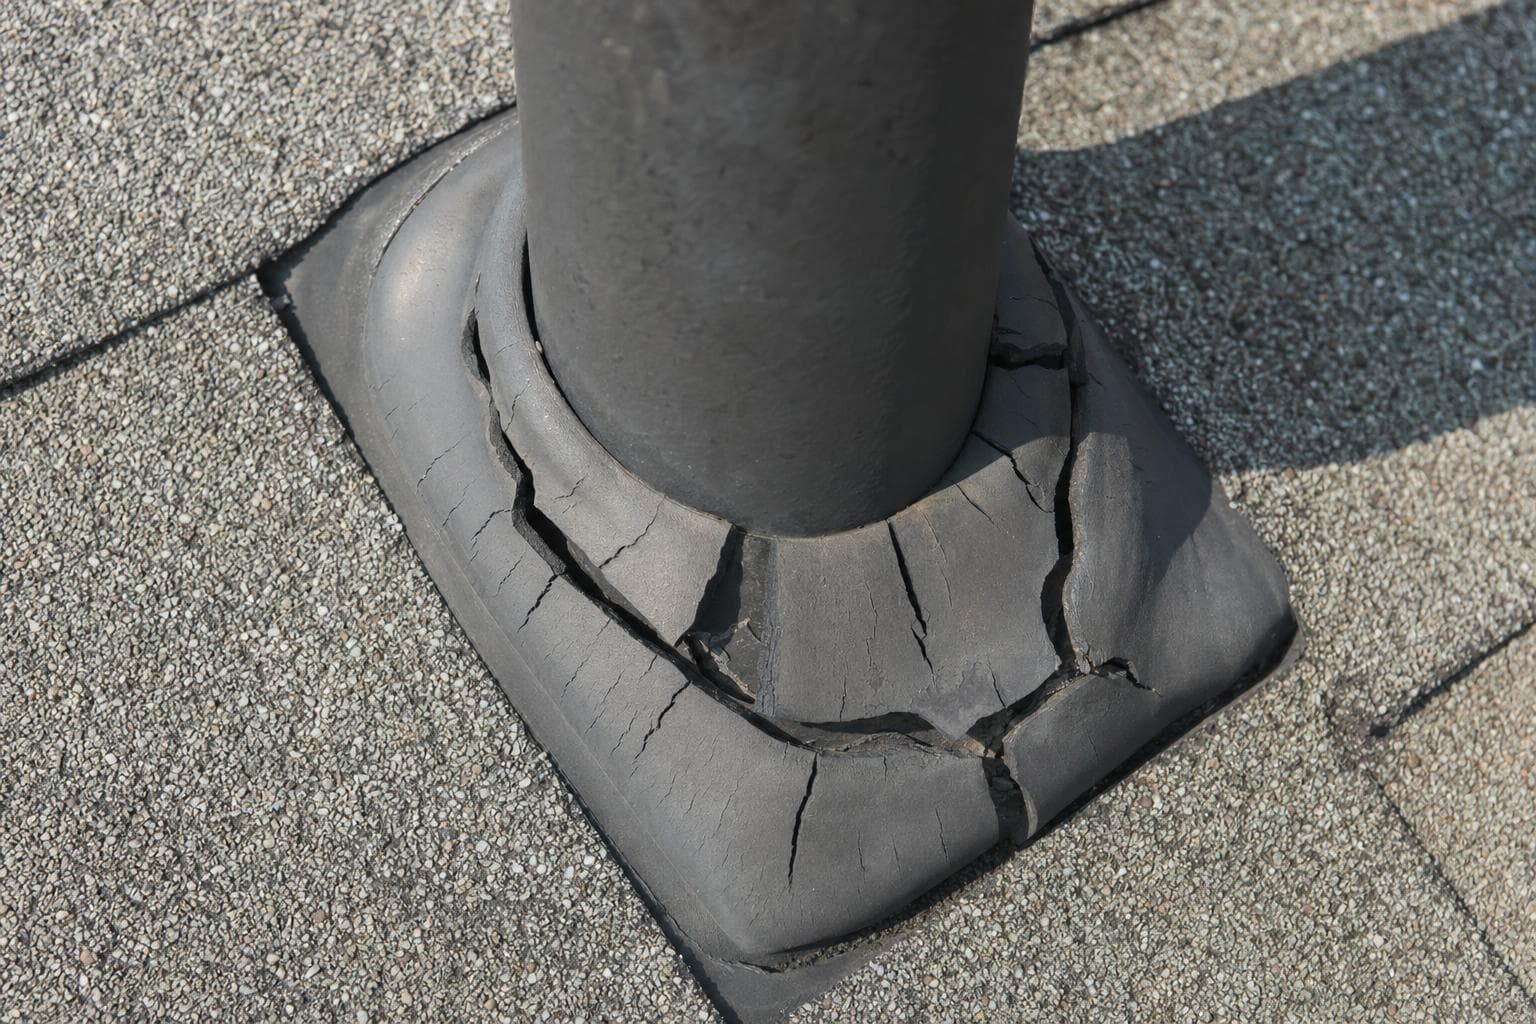
Many plumbing systems use vent pipes that pass through the roof, and each roof penetration needs a watertight flashing detail. A common detail is a pipe boot with a metal or plastic base and a flexible collar around the pipe. Sun, temperature changes, movement, and age can split or loosen that collar even when nearby shingles still look serviceable, creating a leak path that deserves a close inspection.
How a pipe boot fails
UV exposure dries the rubber until it loses elasticity. First come surface cracks, then radial splits where the gasket meets the pipe, then a visible gap. Because the failure is gradual, the leak starts small, a cup of water in a hard rain, wicking down the pipe and soaking insulation long before a stain appears. By the time the ceiling shows it, the leak has often been active for months.
How to spot it before the ceiling does
- From the ground with binoculars: look for visibly cracked, curled, or sun-bleached rubber where pipes exit the roof.
- In the attic: water stains, rust trails, or damp insulation directly around any vent pipe.
- On the ceiling: stains that line up below a bathroom or kitchen, plumbing vents sit above plumbing rooms.
- Age math: original boots on a 10–15 year old roof are due, whether they look bad from the ground or not.
What the repair involves
A lasting pipe-boot repair usually addresses the failed flashing assembly instead of relying only on surface sealant. Depending on the roof and product, a roofer may lift the surrounding shingles, remove the damaged boot, install a compatible replacement within the shingle courses, and restore the surrounding seals. Sealant over a split collar can be a temporary measure, but its useful life depends on preparation, movement, exposure, and the underlying damage.
Talk to a roofer today
Planning ranges, scope details, and a direct path to request a roofing quote.
Compare replacement pipe-boot designs
Pipe-boot products use different bases, collars, shields, and replacement methods. Compare compatibility with the pipe and roof covering, manufacturer installation instructions, exposure, repairability, and warranty. During replacement, name the exact product in the scope instead of assuming one design has a universal service life.
Trace the water path before pricing the repair
A ceiling stain marks where water became visible, not necessarily where it entered. Water can move along decking, rafters, underlayment, pipes, or insulation before it reaches drywall. A useful leak inspection connects the interior symptom to an exterior pathway and explains why that pathway is plausible. That means checking the roof above and upslope of the stain, nearby penetrations and transitions, attic moisture patterns, and whether plumbing or condensation could be part of the problem. For the pipe-boot leak diagnosis, the final record should connect the interior symptom, entry path, failed detail, repair, and follow-up check.
- Map the stain or drip to the attic and roof plane before sealing the most obvious exterior gap.
- Inspect flashing laps, fasteners, seals, surrounding shingles or panels, and the condition of the supporting deck.
- Look for more than one entry point when staining grows during wind-driven rain or appears in separate rooms.
- Document wet insulation, sheathing changes, odor, or visible microbial growth so interior drying is not overlooked.
- Define how the repair will be checked after completion and what evidence would trigger a wider opening.
- For the pipe-boot leak diagnosis, name the entry path and the method that will confirm the repair worked.
Define what a successful repair has to accomplish
The repair should restore the drainage path, integrate with the surrounding roof, and leave a way to confirm that moisture is no longer entering. Caulk alone is rarely a complete explanation when the failed detail should shed water mechanically. Ask what will be removed, what concealed conditions may change the scope, how matching materials will be handled, and whether affected insulation or finishes need separate work. A clear diagnosis keeps a small repair from becoming a cycle of unrelated patches.
A small pipe-boot component can create a significant leak path, so penetrations deserve the same documented inspection as larger roof areas.
Related reading and source material
Locate the failed roof area and test the repair boundary: Pipe boot roof leak
Document cause, consequence, distribution, and uncertainty by slope and detail. Identify what must be removed, how water-control layers and flashings tie into sound material, and which finding would expand the opening or support replacement. Apply that record to the pipe boot roof leak decision and identify which property finding or written term would change the answer.
Preserve a usable investigation and completion record: Pipe boot roof leak
Use overview and close-up photographs, measurements, temporary-work receipts, contracts, changes, invoices, product details, and final photographs. Keep observed conditions separate from insurer, code, and contractor decisions.
Additional reviewed references
Related roofing resources
Related services
Updated July 27, 2026
3D Roofs Editorial Team
Editorial Standards